
Arduino Basics Tutorial and Introduction

Welcome everyone !! I am sorry that I was little busy now a days with my exams and projects, here we started Arduino Obstacle avoiding robot. Robotics is so vast , as it reaching different ends in roots with our logic. We can simulate all the things that we can see and touch through robotics. But the problem is with logic. Anyhow the hardware components are almost available for any project that you may wish to do. Last month I started a project with Arduino , which is an open Source electronic prototyping platform. There are several variants of Arduino are available just like Raspberry pie etc, we can use these PROMS to control electronic components like Servos , LED, Displays , Ethernet , Bluetooth , and almost all the sensors available.

At first glance it may feel very uncomfortable in building up a program code and compiling it,
the problem is we have to write a code and upload it to the Arduino board there after run it, the program can be syntactically correct so that it will not show any errors while compiling it with IDE, but the code may contain several logical errors and shows different behavior. I'm not making you to loose your interest in Arduino, but it just happens only during your starting period. It's necessary that you should need some basic knowledge in Programming and Electronics for playing with it, it's not mandatory. If you are interested then you Can start making machines :P

For making a small robot , we should be very clear with it's functionalities. It's to be clear with
"What we should make " and not "How we will make " . With a clear idea you can start prototyping your robot. There are several websites which will give you source codes of several functionalities, I don't recommend you to copying the same and implementing it, because if there any logical error occurred , then it will not be easily solvable. So, make your own logic and implement it.
Programming
Source code of Arduino is very similar to C and C++ . It's not mandatory to include every library's before starting the project, you should need to use libraries only at some places if you want. Just like rotating a servo motor etc, Here I will show to how blink an LED using Arduino UNO.
For blinking an LED ,
1. Declare which pin are you using for your LED
2.Setup the pin which you have connected as OUTPUT in your Arduino
3.In loop function, show that the pin should go HIGH
That's it for a basic LED Tutorial for arduino :P
Source CODE:
int ledpin=5; // Declaring the 5'th pin as led
void setup() // this function is to setup the connected pins
{
pinMode(ledpin,OUTPUT); //the pin "5" will be assigned as output here
}
void loop() // this function is mandatory in every Arduino code
{
digitalWrite(ledpin,HIGH); //Giving a digital high signal to pin "5"
}
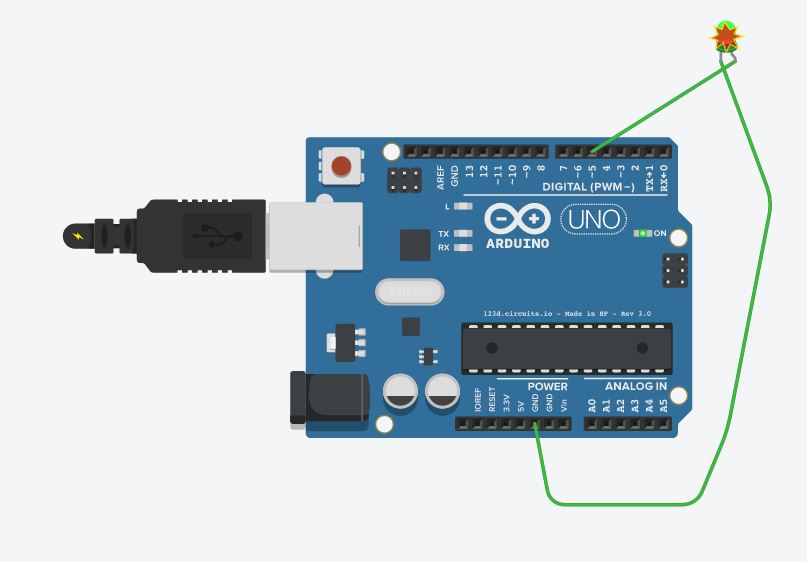
The circuit which i have made with above connection is shown below !!

After assigning these connections ,
connect your Arduino to pc and upload the code using Arduino IDE. Then the LED will light !!
OUTPUT :
This is just a very basic program with Arduino , Arduino supports user defined methods , and several other functionalists like java and C++ .
Useful websites :
Obstacle avoidance Robot tutorials with videos are coming soon !!!
Thank you
Author : Sreekanth


![The best rom for lenovo A6000 [Noguat]](https://lh3.googleusercontent.com/blogger_img_proxy/AEn0k_ts_T3-5yAtQS4RxBfrpKfbmN7Fba17xGBXY1WnnyC2IDWq6AE5V-akAw6v7-0jZcLZAhevXjt-6j7skZEr2Z-ogBI7YFFl2MB0DJ4)
![Blue Tint while opening notification menu for windows 10 [fixed]](https://blogger.googleusercontent.com/img/b/R29vZ2xl/AVvXsEgSDl7fkMsYqWHb2Yjgk66mOgH0H2n2R_TEAkGVlmfSyLrMPhc-seX7gfPbClVDgPZdnC0yhAn4XP2ZEM_H0Li8I88nrAL8xsnISLPmeEbHrVs63tyQ3vEEQ8RLfFRfNqeATO29xtiSkLQ/s72-w583-c-h328/image.png)

0 comments: